
This post explains how I make teaching videos. I’ll be using the last video I made, found here, as my working example.
The first thing to be clear about is if you don’t want to make YouTube videos then you absolutely should not.
This is not a teaching responsibility.
It is time consuming and labour intensive. If you don’t have much time for whatever reason then this guide is unlikely to be helpful.
Stop reading and look elsewhere – there are much quicker methods.
I start by making sure my subject knowledge is solid. For any short video you’ll need to know a lot more than you’ll deliver, because what you’re making can only ever be a summary.
For my “Did 1066 change much in England?” video, my general subject knowledge was already pretty strong.
I’ve taught the topic for many years and read reasonably widely about it. This subject knowledge allowed me to come up with an authentic structure pretty quickly – which in this case is around change and continuity.
I find it also worth considering what topics or foci will give the video most utility – covering a fairly big topic that roves over quite a lot of stuff usually works better than a video focused on one discrete aspect of a curriculum, which you’re likely to find you can only use once a year.
Very niche videos are also not particularly helpful to pupils who want to revise. Again, strong subject knowledge makes decisions about what to cover easier.
Next, I spent a bit of time reminding myself of the basic stuff, using websites such as BBC Bitesize and Wikipedia. While I’ve taught this topic a lot I haven’t recently.
Twenty minutes online is usually enough to get back up to speed.
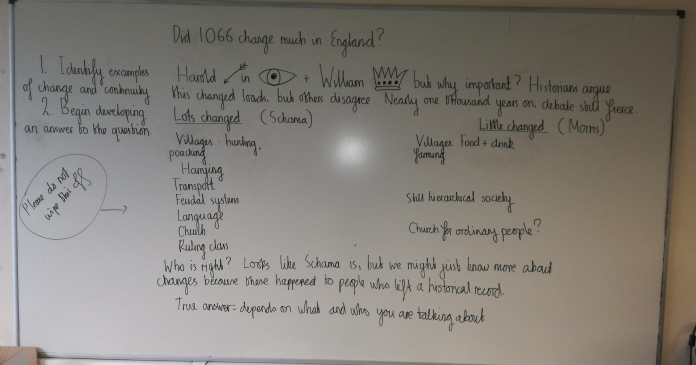
At this point I’m usually ready to mock up a paper draft of what my board will look like:

I don’t think about illustrations at all while making up this draft. It’s just to create a narrative structure that organises the information logically.
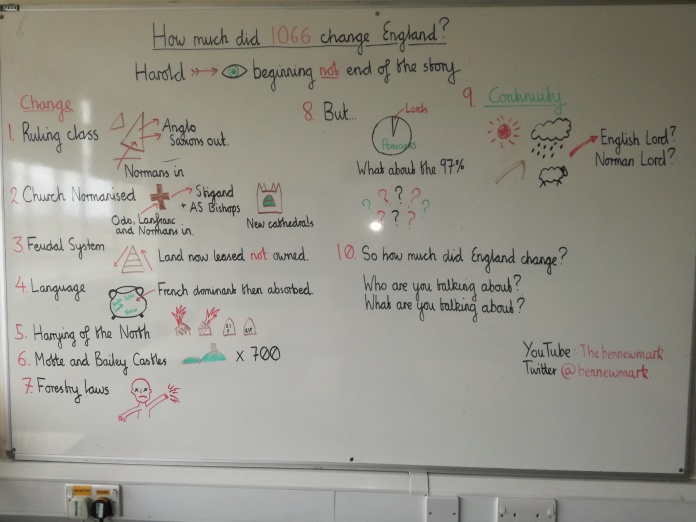
Once I’ve done this I mock up a similar draft on a whiteboard:
I do this because I’ve found sometimes what works quite well on paper just sort of doesn’t when it is enlarged. It’s while making up this draft I begin to consider, but only consider illustrations. What’s simple to draw and could represent a burning village? How do I show that French enters the language along with other influences that were already there? Can I use an image to do a bit more work than my delivery?
Once this is all done I proceed in one of two ways, with my choice depending on the topic, how I’m feeling and how much time I have.
- Straight to video.
First, make up your neat board.
Carefully consider colour and image, thinking about how illustrations and layout reinforce messages and don’t detract from them.
Remember a really bad drawing, or a drawing supposed to look like something that actually looks like something else can be really distracting, causing your viewers to lose focus. It really isn’t necessary for the illustrations to be works of art – efficiency and clarity are much, much more important. For example, my drawings of England are usually simple triangles.
Do not expect too much of yourself to begin with – my illustrations have improved but this is because over time I’ve done lots so have built up a sort of bank of icons I use consistently.
Once the board is finished it’s possible to go straight to explanation and filming. This is the way in which most of my videos – but not actually this one – are made.
It’s sensible to take some time to make sure lighting is right (watch out for glare on the board), and the camera (my phone camera works fine) is mounted somewhere safe and steady. There is little more frustrating than finishing a video only to find it compromised by camera wobble or annoying autofocus issues. Also think about the angle of the camera – once you begin delivering you will naturally look towards it and if it is off centre, this will look weird when played back.e
Remember although the video doesn’t have to have professional production values, young people today have pretty good photography and videoing skills, and may be less forgiving of niggles than was the case in the past.
Practise. Go slow. Work through each stage of your board work. If you make a mistake, if it is minor, practise continuing anyway. Aim for good not perfect or you’ll never get to the end.
Once you feel you’re ready begin videoing. Expect there to be a lot of takes. You won’t get it right first time. Once you have a complete video, watch it back. Are you happy? Can you be bothered doing it again? Is it good enough?
If not repeat. If yes, post to whatever platform you’re using to share it.
- Script and autocue.
This is the method I used to create the 1066 video I’m using as an example. For this write out a word for word script. This can really help with making sure what you’re delivering is tight and focused. As you write remember this is a script for what you’ll actually say, not a blog post or academic essay – your register should not be as formal – it should feel like you are teaching a class.
Once your script is finished then make up your board in the exactly the same way I described in Method 1: Straight to Video. If you are going to script it’s much better to do board-work after, so it follows your narrative.
Then find a piece of autocue software. There are lots of free versions of these on the internet. For this video I used this one, which allows you to adjust the speed. Experiment with a few speeds to find one that feels natural.
Set up your computer somewhere central to the board, and make sure your camera is mounted on or near it. For the 1066 video I actually Gaffer-Taped my phone to my computer. This is important as you’ll need to be looking in the same direction.
Even with autocue you’ll still need to practise a lot – this is because you’ll need to work out when to refer to board work and experiment with body language and tone. It’s likely through this practising process you’ll find you need to make revisions to your script too.
And that’s it! Good luck. This is clearly an awful lot of work and it is really important to again be clear this is absolutely not for everyone, and should not be an expectation of anyone.
While I hope my videos are useful to pupils, making them is a hobby of mine. I enjoy it, but that this is the first I’ve made in three years. My eldest daughter is now just over three. This tells you all you need to know about how time consuming they are to do properly.
Two final hints:
- Makes sure there is enough storage space on your device. Doing a really good explanation and then finding it didn’t record all the way through is heart-breaking.
- Put a ‘Do Not Disturb’ sign on your door.
Unless you want one of your videos to contain a child shouting “Mrs Hodges says I need a new book!”

Pingback: How YOU can help our mission of learning about teacher wellbeing and anxiety - Teacher Tapp